
How to Configure Static IP on Ubuntu. Hello, welcome back to my blog. Today i will sharing about how to configure static IP on Ubuntu Linux. some user want to configure their local IP address so their IP will not changed every restarting their Ubuntu network service.
First, you need to check what your network interface name.
ifconfig
In this tutorial, my Ubuntu using ens33.

There is two options to configure static IP address on Ubuntu. The old one, using Network Manager and the new one, that introduced first on Ubuntu 17.10 update, using Netplan.
How to Configure Static IP using Netplan
Netplan used on newer Ubuntu version, start from Ubuntu 18.04. First, run this command to edit Netplan configuration file.
sudo nano /etc/netplan/50-cloud-init.yaml
Edit become like this
 ens33:
            addresses: [192.168.23.21/24]
            gateway4: 192.168.23.2
            dhcp4: no
            nameservers:
              addresses: [1.1.1.1, 1.0.0.1]
See this screenshot:
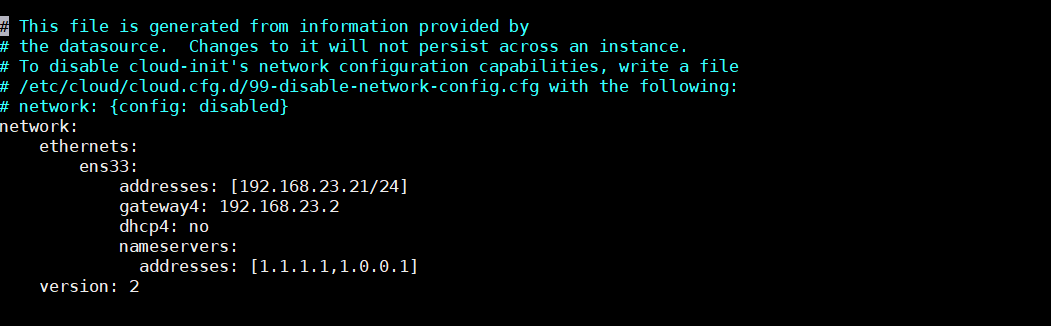
You need to adjust your own ip and gateway. Next, save the file and run this command to apply the changes.
sudo netplan apply
Then, check again your ip address. It should change to your new configured IP address.
ifconfig ens33

How to Configure Static IP using Network Manager
If your system not using Netplan, or you don’t like using Netplan, you can configure your static IP using Network Manager. First, edit Network Manager configuration file
sudo nano /etc/network/interfaces
Next, add this configuration
auto lo
iface lo inet loopback
auto ens33
iface ens33 inet static
        address 192.168.23.21
        netmask 255.255.255.0
        network 192.168.23.0
        broadcast 192.168.23.255
        gateway 192.168.23.2
        dns-nameservers 1.1.1.1
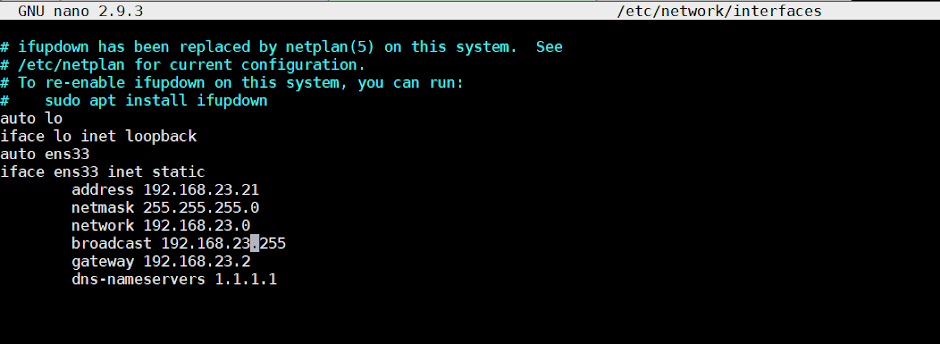
You need to adjust your own ip and gateway. You can find your gateway using route -n command.
Next, install ifupdown (if it is not installed).
sudo apt install ifupdown
Then, restart Network Manager with this command
sudo ifdown -a && sudo ifup -a
Now, your IP address should be configured.

Ok, done. Don’t forget to comment, and share. Thank you.


